Showing posts with label Shelf Layout. Show all posts

Thursday, December 28, 2023

Weyerhaeuser Paper Products

 Industry number 2 for my Freeport Industrial Center layout is Weyerhaeuser Paper Products.  This represents an industry that was actually located a couple of miles farther west on the line but it is one I have always been interested in.  Weyerhaeuser receives a lot of traffic, several carloads of paper, each week.  This is enough to justify switching this industry on almost every operating session.


Boxcars are spotted at the loading dock and the car order is not important.  This makes for a fairly easy job.  The types of cars are mostly 40ft to 60ft hi-cube boxcars.  Standard height 50ft cars can also be used.  The most challenging part of the job is that it is a leading point switch so a runaround is always required.

The loading dock is a neat feature of this industry and will accommodate 3 cars typically, though you can fit in 4 cars if they are all 40ft.  On the prototype, there is a roof over the dock and the car spots.  I really wanted to model this feature but there is just not enough room between the industry spur and the mainline to make it look right.  I might do the cover only over the dock.  Below you can see what the building looks like today.


The building is comprised of two Walthers Modern Concrete Warehouse Background Building kits.  This allowed me to build a building that is 33.5" long and about 2" deep.  The footprint of the industry will end up being about 42" wide when it's all done.  The dock is made from one set of Pikestuff Modular Loading Dock kit.  The dock is not yet attached to the building but will be once the site has been properly leveled.  I added a few roof details from the Walthers Roof Details kit.  This is a must as the background building kits have no roof details at all.  There are other similar industries in the Phoenix area and it seems to be common practice to store extra paper rolls outside.  These rolls are huge and I will add a few next to the building once I decide on a modeling method.


Friday, December 8, 2023

Southwest Grocery Distribution

 Just a quick update on the first industry for my layout - Southwest Grocery Distribution.  This is a large concrete warehouse with three car spots.  The entire model is about 42" long and is along the backdrop off the mainline (the mainline on my layout is actually visible staging).  The basic assembly is about 90% complete with the final details to be added after painting.


The first door (the largest) is for refers only.  The middle door can be either refers or general boxcar.  The last door is for boxcars only.  This door arrangement should make for some interesting switching and may require off-spotting cars from time to time.


The industry comfortably holds 3 50' - 60' cars with space between them.  


This started as the Modern Cold Storage Warehouse from Walthers and I unrolled it into a background building.  I had build up a floor and a roof from scraps and Evergreen styrene.  I am really happy with how this is going and will be moving on to the painting stage soon.

Monday, November 22, 2021

Shelf Layout Lighting

 Next step in the shelf layout project is to add some lighting.  My room is pretty well lit but I really wanted to highlight the layout.  I am hoping to achieve a shadowbox effect.

The light fixture I selected are from Commercial Electric. These are LED, like most things these days, and come in several different lengths.  I used a mix of 2' and 4' fixtures.  The nice thing about these is they are linkable.  This allows so several fixtures to be daisy-chained together off of a single power cord and switch.  This really simplified the installation.


The overall effect is pretty good but not quite as bright as I had hoped.  I think this will work out fine but  might look into some additional lighting down the road.

Sunday, November 21, 2021

Finishing the Shelves

 Once again, I have let several months pass without a blog update.  I have actually been very busy with the hobby, I have just been lazy about posting.  After my last update in August work continued on the new shelf layout.  By the end of the month the shelves were all installed and the foam tops installed.

The shelves are made of particle board with melamine coating. This makes then very hard and slick.  To glue down the foam insulation board I used Loctite Power Grab All Purpose Construction Adhesive.  This stuff worked great.  It is a little tough to use from a tube for this size project so I have to go back and get the caulking gun tubes.

Before I glued the foam down I prepped the ends of the foam boards and the joints in the shelves.  I wanted to make sure the shelves and the ends of the foam did not get glued together incase I ever need to take the layout down.

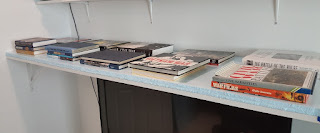
In order to make sure I got a good bond to the shelf I weighed down the foam with some books.  This worked out great and the foam is not going anywhere.


After the shelves were installed and the foam added I realized that my inside corners were just too sharp and were going to be an issue.  I had some scrap wood so I cut some triangles to make a better transition.  Some scrap foam was added to bring it up to the level of the rest of the layout.


I wanted to make sure the inside corners were as sturdy as the rest of the shelves so I used heavy framing hardware to attach them.  This does not move at all.


I am much farther along with the project now and I will be posting a couple more updates very soon. One thing I wish I had done different at this stage is the inside corners.  I realize now i would have make them much larger but they will still work.  Stay tuned for more updates.

Tuesday, August 10, 2021

New Shelf Layout Project

 It has been a couple of months since my last update.  It is crazy hot in Phoenix this  time of year and a garage layout is just a form of torture.  Way to hot out there to do much of anything.  The reality of this has inspired me to move ahead with my in-door shelf layout.

The layout will be located in my home office/study/den. This room is about 11'x13'.  There are double entry doors along one wall and a window on the wall directly opposite. The room needs to continue as an office as I work from home. This means a U shaped shelf layout will be the best fit for the space.  The layout will be about 55" off the floor to allow for easy access under the layout for desks and work bench, etc.

I wanted to have lots of surface area for buildings and scenery as well as interesting track layout so the majority of the layout will be 24" wide.  The span across the window is a concern as the window is nearly 5' wide.  Because of this I limited the deck width to only 12" to minimize/eliminate the need for extra support across the window.

I started the project on the right side of the room on one of the long walls.  The layout will have a 12" wide shelf on the top for storage but more importantly for a lighting valance. 

For the top shelf I used simple stamped steel L brackets.  These are screwed directly into the wall studs.  These types of brackets are cheap and hold a lot of weight.  

This wall has studs that are spaced 24" on center so the brackets are 24" apart. Each bracket is carefully placed to ensure it is level with the previously installed brackets. 

The shelf is a 12" wide particle board style that is coated in a plastic material with a plastic edge. These are made for closet organizers and are cheaper than real wood.  With the ample support the shelf is stable and will not sag or warp.

It already has a finished look with little effort.  So far so good.

With the header shelf in it is time to move on to the main layout shelf.

Since this shelf is so much larger and heavier the brackets are bigger and it gets and extra bracket at the end.  The main weight is carried by the triangular brackets, of which there are 4.  There are also 4 L brackets used mostly to prevent sag and add to the stability.  Leveling is CRITICAL.  

I used the same manufactured wood material as the header shelf and it has the same finished look without much effort.  They are sold in 8' lengths but I cut each down to just under 7' to ensure the seams did not overlap the brackets.  I also cut the corners off where the shelf meets the corner of the room to allow for power cords.  In addition, the shelf is mounted about 3/4" from the wall to make the actual width 24" and for additional cord access behind the backdrop.

Here is the finished phase one with 1" blue foam on top.  The foam is not attached yet but has been trimmed to fit.

So far this is exactly as I envisaged it.  

Phase 2 is spanning the window.  This was a challenge as I did not want to have to engineer addition center support across the span.  This was an experiment but it worked out.

Once again I started with the header shelf.  Since I would have less support for this section I switched to actual 1"x12"x10' lumber.  Wow! This stuff is expensive. Real lumber is much more ridged and will hold up over time where particle board will not.  This shelf is held up with 4 L brackets.  

After a some re-adjustment of the header brackets I got a nice, level span across the window.  This made the installation of the layout shelf easier. The layout shelf got the heavy triangle brackets and is nice and solid.

Phase 3 will be the installation of the shelves on the left side of the room.  This will be a couple weeks down the road.  Until then the window shelves will not be screwed onto the brackets so it will be easier to level the new section.  It will also allow me to make any length adjustments easily.

Stay tuned for more updates on this soon.

2023 Year in Review and Looking Ahead to 2024

  The New Year brings and opportunity to look back on the old year and reflect on how things have gone, and perhaps, learn some lessons that...